| 📕 | This article is potentially outdated!
|

The overabundance of cheap and easy-to-get healing in the Fallout games really trivializes any sense of a true survival feel. The only way to heal in Horizon, is through actual medical treatment. Eating food, drinking water, sleeping or leveling up to heal off injuries or limb damage is gone. Healing is now fixed values, instead of percentages and the health pool has been altered to match the new system. A larger health pool allows to have a wider buffer for dealing with injuries and taking big hits. Enemies in default difficulty, wear the player down, but usually can't just 1-shot at full health anymore. This also helps counter the unrealistic "ping-ponging" of constant damage and healing.
General[]
All healing is now fixed values, instead of percentages. Vanilla Stimpaks are gone and replaced by Adrenaline Injectors. To instantly heal in combat the player needs Combat Stimpaks, rare and very expensive items. Limb Damage can only be healed by doctors and Trauma Kits or Glowing Blood Packs. To some extend by First Aid Kits and, even by a very small amount, Combat Stimpaks (to allow to move).
| “ | All things are poison, and nothing is without poison; but the dose makes it clear that a thing is not a poison. | „ |
|
Health Pool[]
The player's max health pool no longer automatically increases with each level.
- Base HP: 190 (up from 80).
- Endurance: +20 HP per attribute point (up from +5) which is 200 total.
- Perks and Magazines[citation needed] increase health pool;
- Life Giver; +30 per rank, +120 max.
- Adamantium Skeleton; +10 per rank, +30 max.
In total, the player can reach about 540 HP[citation needed] (190+200+120+30). This is especially useful for higher difficulties like Outcast, where enemies do very high damage.
Health Regeneration[]
Regaining health doesn't work as in Vanilla FO4 anymore. food, water, beds and leveling up no longer regenerates health. Any health regeneration from perks and magazines is removed or converted into increased health pool.
Healing[]
Any health and limb damage can be healed either by using certain healing items or by requesting doctor treatment but not via time, sleeping, waiting, etc. All items can be crafted in the Chemistry Station while some can be crafted using the Cooking Station (Bandages, Trauma Kits) and in the field using the Field Kit.
Healing items such as Bandages and First Aid Kits can only be used outside of combat and require time to regenerate health.
Various healing supplies can heal more HP from medical skill above 40 points which equal 2 ranks in the medic perk. A medical skill of 40 to 180 improves healing for Bandages, Medicated Bandages, First Aid Kits, Stimpaks, and RadAway. Every 20 skill gains 10% +healing (80% max at 180 pts).
Survival mechanics such as Hunger or parasites (![]() ) reduces the amount of healing received when using medical supplies. Being "Well Rested" in turn gives a bonus to the amount of healing received when using medical supplies.
) reduces the amount of healing received when using medical supplies. Being "Well Rested" in turn gives a bonus to the amount of healing received when using medical supplies.
Stimpaks[]
Vanilla "Stimpaks" were changed and replaced by "Adrenaline Injectors". Adrenaline Injectors don't heal but revive companions instead.
Antibiotics[]
"Antibiotics" have been renamed to "Advanced Cure-X" which can cure any Disease/Illness.
Pricing[]
Combat Stimpaks, RadAway and Advanced Cure-X are all increased greatly in cap prices. doctors charge significantly more for all recovery services and have a brand new menu-driven system that charges caps for any cure needed.
Health Management[]
Proper healing, protecting, or empowering requires either chemistry, medical, and/or survival skill. The majority of the items listed can be crafted at either the chemistry (![]() ) or the cooking station (
) or the cooking station (![]() ), a very small amount of medical items can even be crafted in the Field Kit (
), a very small amount of medical items can even be crafted in the Field Kit (![]() ). A large number of medicines require antiseptics, pharmaceuticals, purified water, and other specific ingredients.
). A large number of medicines require antiseptics, pharmaceuticals, purified water, and other specific ingredients.
| Item | Effects | Time | Rate | Pts | Recipe | Skill | |||||||
|---|---|---|---|---|---|---|---|---|---|---|---|---|---|
| — | — | — | Addictol | — | — |
|
— | — | — | — | — | ||
| — | — | Adrenaline Injector | — | 🦴 |
|
— | — | — |
|
||||
| — | — | Advanced Cure-X | — | — |
|
— | — | — |
|
||||
| — | — | Antibiotics (Basic) | — | — |
|
— | — | — |
|
| |||
| — | — | Antibiotics (Herbal) | — | — |
|
— | — | — |
| ||||
| — | — | Atomic Scotch |
|
varies | — | — |
|
| |||||
| Bandage | — | — |
|
70s | 1/s | 70 |
|
— | |||||
| — | — | Berry Mentats | — | — |
|
8m | — | — |
| ||||
| — | — | Buffjet | — | — | 12s | — | — |
|
| ||||
| — | — | — | Buffout | — | 10m | — | — | — | — | ||||
| — | — | Bufftats | — | — |
|
10m | — | — |
|
| |||
| — | — | — | Calmex | — |
|
5m | — | — | — | — | |||
| — | — | — | Calmex Silk | — | — | ? | ? | ? | ? | — | — | ||
| — | — | Combat Stimpak | — | 🦴 |
|
50s | 2/s | 100 |
|
||||
| — | — | — | Daddy-O | — | — |
|
10m | — | — | — | — | ||
| — | — | — | Day Tripper | — | — | 15m | — | — | — | — | |||
| — | — | First Aid Kit | — | — | 🦴 | — |
|
70s | 3/s | 210 |
|
| |
| — | — | — | Fixer | — | — | 5m | — | — | — | — | |||
| — | — | Fury | — | — |
|
2m | — | — |
|
| |||
| — | — | Glowing Blood Pack | — | 🦴 |
|
15m | — | — |
|
||||
| — | — | Grape Mentats | — | — |
|
8m | — | — |
| ||||
| — | — | Herbal Anodyne | — | — | 1h | — | — |
| |||||
| — | — | Herbal Antimicrobial | — | — | 1h | — | — |
| |||||
| — | — | Herbal Remedy | — | — |
|
1h | — | — |
| ||||
| — | — | Herbal Stimulant | — | — | 1h | — | — |
| |||||
| — | — | — | Hydra | — | 🦴 | — |
|
200s | — | — | — | — | |
| — | — | Jet | — | — |
|
10s | — | — |
|
| |||
| — | — | Jet Coffee | — | — |
|
20m | — | — |
|
| |||
| — | — | Jet Fuel | — | — |
|
60s | — | — |
|
| |||
| — | — | Loaded B1 Shot | — | — | 2m | — | — |
|
|||||
| — | — | — | Med-X | — | 10m | — | — | — | — | ||||
| — | Medicated Bandage | — | — |
|
70s | 2/s | 140 |
|
| ||||
| — | — | Melon Juice | — | — | 15m | — | — |
|
| ||||
| — | — | Mentats | — | — |
|
5m | — | — |
|
| |||
| — | — | — | Nuka-Cola Quantum | — | — | — | — | — | — | — | |||
| — | — | Orange Mentats | — | — |
|
8m | — | — |
| ||||
| — | — | Overdrive | — | — |
|
8m | — | — |
| ||||
| — | — | Poison Antidote | — | — |
|
1m | — | — |
|
| |||
| — | — | Poison Antidote (Survival) | — | — |
|
1m | — | — |
|
| |||
| — | — | Psycho | — |
|
5m | — | — |
|
| ||||
| — | — | Psycho Jet | — |
|
10s | — | — |
|
| ||||
| — | — | Psychobuff | — | — | 8m | — | — |
|
| ||||
| — | — | — | Psychotats | 5m | — | — | — | — | |||||
| — | — | Rad-Chew | — | 100s | -0.5/s | -50 |
| ||||||
| — | — | Rad-Off | — | 50s | -2/s | -100 |
|
| |||||
| — | — | — | Rad-X | — |
|
10m | — | — | — | — | |||
| — | — | RadAway | — |
|
50s | -3/s | -150 | ||||||
| — | — | Rebound | — |
|
10m | — | — |
|
| ||||
| — | — | Refreshing Beverage | — | — |
|
1s | -300/s | -300 |
|
||||
| — | — | Rocket | — | 1m | — | — |
|
||||||
| — | — | Skeeto Tonic | — | 30m | — | — |
|
| |||||
| — | — | — | Smooth Operator | — | — | — | — | — | — | — | — | ||
| Trauma Kit | — | 🦴 | — |
|
200s | 0.1/s | 20 |
|
— | ||||
| — | — | Ultra Combat Stimpak | — | 🦴 |
— |
|
50s | 5/s | 250 |
|
| ||
| — | — | Ultra Jet | — | — |
|
5s | — | — |
|
| |||
| — | — | Ultra RadAway | — | — |
|
50s | -7/s | -350 |
|
||||
| — | — | V7 Juice | — | — | — | — | — |
| |||||
| — | — | — | X-111 Compound | — | — |
|
2s | -125/s | -250 | — | — | ||
| — | — | — | X-Cell | — | — |
|
10m | — | — | — | — |
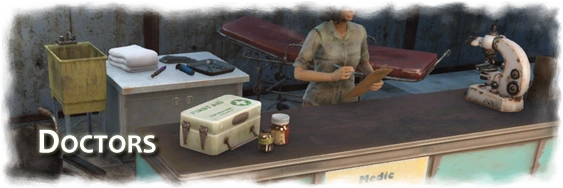
Doctors[]

Doctor Service Menu
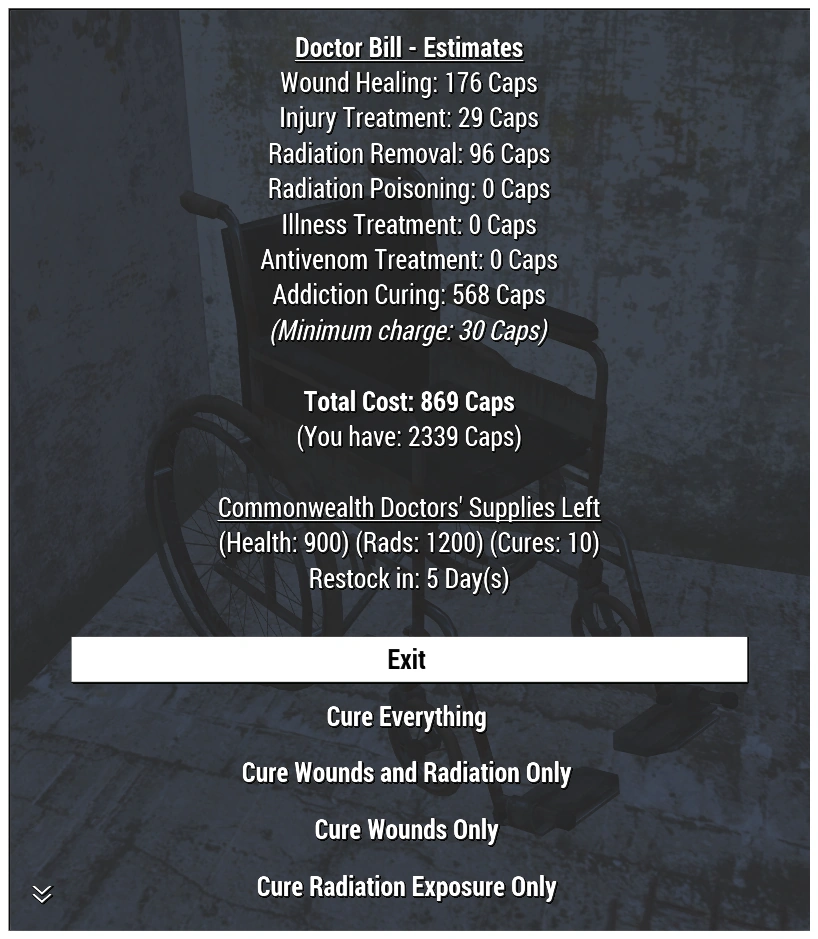
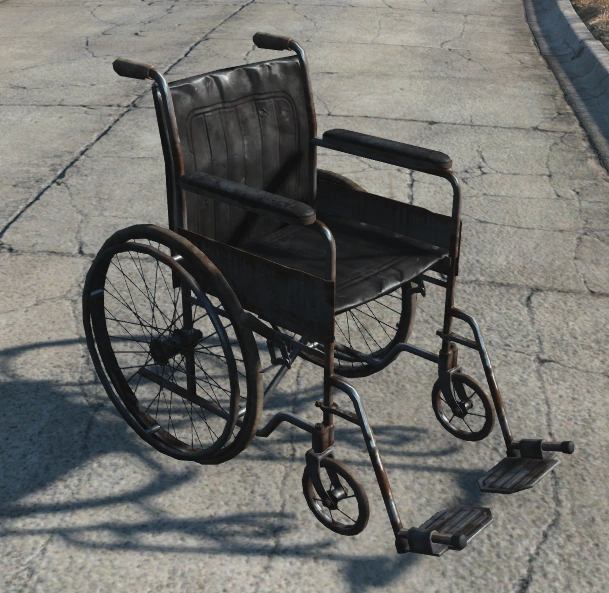
Doctors services have been overhauled to be easy yet flexible to use, with the addition of an unique medical treatment menu when requesting help from a doctor. Additionally, there is a Medical Service building object (Architect > Utilities) that looks like a wheelchair and allows to use any doctor services effortless and instantly.
Medical Treatment[]

"Medical Service" Building
Doctors charge caps based on exactly what's cured and how much was cured. Curing everything at once will cure rads first, so that all health is fully healed. Curing everything at once can potentially be more cost effective and easier/faster to deal with. There's a minimum cost of 30 caps per selection (which is why it's recommended to "Cure Everything" if possible).
- Addiction cost is based on the amount of total addiction, not the number of individual addictions and can go all the way up to "1000 + Level Multiplier" in caps.
- Wound healing can be performed separately since rad healing covers it's own part of the health bar by itself.
- Radiation healing also heals the amount of health it cured, but charges caps for that healing.
- Rad Poisoning has its own button and cost listed on the menu.
Pricing[]
There's a minimum cost of 30 caps per selection.
| Health | 1 cap per health healed |
|---|---|
| Rads | 0.5 caps per rad healed |
| Limbs | 0.5 caps per total percentage needed to be healed |
| Disease | 20 caps per disease |
| Poison | 20 caps per poison |
Pricing in Desolation Mode[]
- Doctors have a much stricter price increase per level
- Doctors have a very limited amount of healing per week compared to default mode
- The number of supplies is very low
Pricing in Default Horizon[]
- Costs for curing is 50% less in non-Desolation mode
- The number of supplies is very high
Doctors and Settlements[]
Vendors[]
Doctors have limited supplies which are restocked every 10 days (6 days in the Timescale Addon) and limit how much of a doctor's services one can use. The number of supplies for default Horizon is very high as opposed to Desolation Mode. All prices for healing increases through level up (levels 5-45). All supplies are shared between all doctors, this keeps the system simple and reliable, without micro-managing different doctors.
Doctors will usually only buy meds, food, chems, and tools/junk. Not having any doctors decreases Wellness by 30% while having a doctor and/or purifier will attract a few extra Tenants.
Medical Service[]
In order to build a Medical Center or Medical Station, both can be found in the Vendor Stall section, one requires a Vendor Contract to finally "unlock" a doctor. A Medical Service (Wheelchair) can link instantly to a doctor if at least one doctor has been assigned locally.
Essential Settlers[]
This new system adds an immersive way to make settlers essential, not killable, neither by the player nor non-player characters (NPC). This option is Off by default. It can be turned On in the "Local Settlement Statistics" menu, either by using the Command Table or Recruitment Station menu.
The option can only be toggled per settlement, locally, it doesn't count globally. At least 1 Doctor (Vendor Stall: Medical Center or Medical Station) in that settlement is required. If the doctor is withdrawn, the option expires and the settlers become killable again.[citation needed]
Technical Issues[]
- No more health regeneration through leveling up, begins working only after the first character level.
- The player can still heal faster by consuming healing items etc. before Traveling. Since traveling is calculated in in-game time, the Health/Rad bar is immediately refilled.
- All crafting actions in the cooking station give +0.01 Survival Skill (no distinction is made here)
- All crafting actions in the chemistry station give +0.10 Chemistry Skill (no distinction is made here)
- Psychotats uses the slot machine texture[1]. fixed it in 1.9.